Halloo .....
 Pertama adalah install Via Installer Driver Printer HP 7000
jika temen-temen belum punya drivernya silahkan download di : Download Disini.....!!
Silahkan pilih OS yang sesuai dengan PC anda , file installer nya +/- 116 MB .
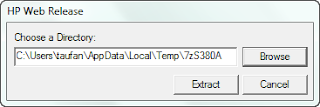
Setelah Download drivernya silahkan jalankan drivernya klik Extract , setelah extract akan autorun ke menu installer HP .
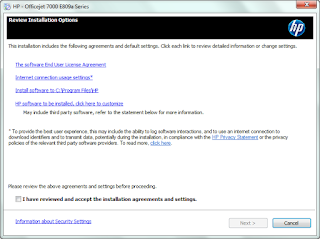 Ceklist I Accept the installation lalu Next
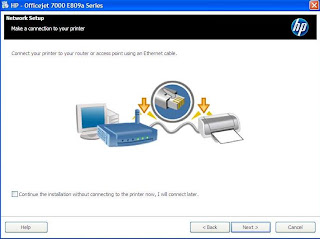
 Pilih Wired network connection using an Ethernet Connections .


Sambungkan Ethernet Port Printer HP 7000 ke Hub/Switch (Rj-45 Conector) , lalu klik next .


 Klik Finish , selesai instalasi menggunakan CD Driver ,selanjutya setup dilakukan dengan mengakses IP address via Web Browser yang ditampilkan di step diatas.


Cara Add Printer
Start > Device and Printer

Klik Add Printer , lalu Pilih Add a network , wireless or Bluetooth printer ,next
 Installing Printer , Next

Update 18/04/2013
***************************************************************************************************
Untuk Client Windows XP yang ingin connect ke HP 7000 via ethernet silahkan ikuti panduan berikut :
anda tidak bisa langsung add share printer di menu printer and fax> add printer
melainkan anda harus menginstall driver HP 7000 secara manual
jalan kan driver hp7000.exe (drivernya sama dengan diatas)
Jalankan wizardnya
Pada saat muncul menu install seperti diatas , klik next
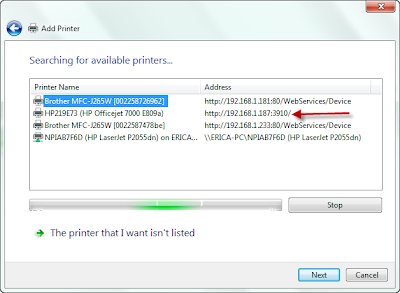
 Jika Printer anda tidak terdeteksi juga , klik My Printer is not listed , centang Show advanced Search Options , lalu isikan IP address Printer anda ,,,then klik next

terlihat Printer sudah terdeteksi Officejet 7000 ip 192.168.1.187 ,klik next
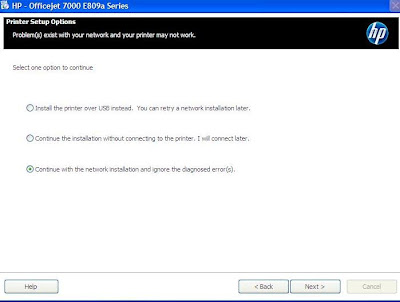
pilih Continue with the network instalation and ignore the diagnose
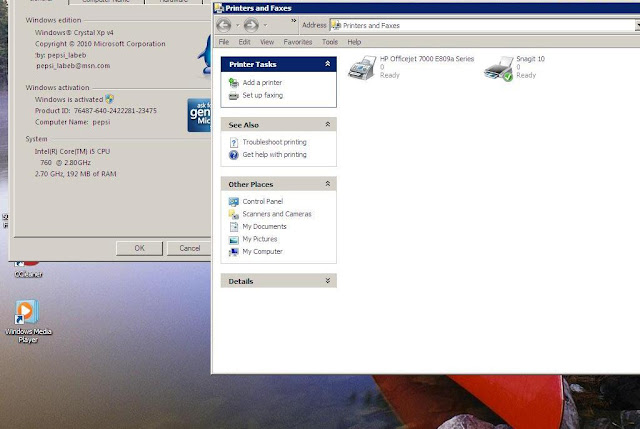
Printer sudah terinstall di OS windows XP
.....
Kali ini saya akan share cara menginstall Printer HP OfficeJet 7000 Wide Format , Printer yang Support Kertas A3 , instalasi koneksi yang digunakan adalah Via Ethernet ( Network agar printer digunakan secara Stand Alone , dimana tidak terinstall di PC / Laptop , jika di instal di Laptop / PC disamping perlunya PC untuk dijadikan installer printer , juga apabila PC / laptop tersebut sedang rusak atau berpindah tempat , client lain tidak bisa menggunakannya. Maka akan lebih baik apabila memang printer tersebut Support Ethernet kita bisa manfaatkan Fiturenya ...

jika temen-temen belum punya drivernya silahkan download di : Download Disini.....!!
Silahkan pilih OS yang sesuai dengan PC anda , file installer nya +/- 116 MB .
Setelah Download drivernya silahkan jalankan drivernya klik Extract , setelah extract akan autorun ke menu installer HP .


Sambungkan Ethernet Port Printer HP 7000 ke Hub/Switch (Rj-45 Conector) , lalu klik next .


Printer HP 7000 sudah terdeteksi IP address nya ,192.168.1.187 (Automatic IP/dhcp), klik next
*Untuk setting Static IP nanti setelah selesai instalasi .


Setting IP Static Printer
Silahkan buka Ip Address Printer via browser firefox/chrome ke ip printer ( 192.168.1.187)
Ke Menu Networking>Connections>Wired (802.3) lalu isikan Ip address, Subnet, Gateway serta DNS nya


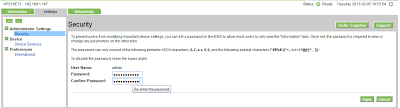
Lakukan juga setting untuk login Password , agar hanya administrator saja yg dapat mengubah konfigurasi Printer .
Silahkan menuju Settings > Administrator Settings > Security ( isikan Password dan confirm Password ) , lalu Apply
Cara Add Printer
Start > Device and Printer

Klik Add Printer , lalu Pilih Add a network , wireless or Bluetooth printer ,next

setelah itu terlihat diatas Printer HP officejet 7000 terdeteksi di IP 192.168.1.187 dengan port default 3910
silahkan pilih printer lalu klik Next


Printer sudah selesai di tambahkan di komputer Client . :)
Selamat Mencoba ....
***************************************************************************************************Update 18/04/2013
***************************************************************************************************
Untuk Client Windows XP yang ingin connect ke HP 7000 via ethernet silahkan ikuti panduan berikut :
anda tidak bisa langsung add share printer di menu printer and fax> add printer
melainkan anda harus menginstall driver HP 7000 secara manual
jalan kan driver hp7000.exe (drivernya sama dengan diatas)
Jalankan wizardnya

Pada saat muncul menu install seperti diatas , klik next


terlihat Printer sudah terdeteksi Officejet 7000 ip 192.168.1.187 ,klik next

pilih Continue with the network instalation and ignore the diagnose

Printer sudah terinstall di OS windows XP
.....
saya coba di win xp untuk client ko gak mau detek server yamas... mohon pencerahan
ReplyDeleteBisa mas ,,silahkan lihat panduan yg sudah saya update diatas
ReplyDeletemass saya mau tanya ,, kalo cara riset ip_addres nya gmna yah ?? ...
ReplyDeleteSetting IP Static Printer
ReplyDeleteSilahkan buka Ip Address Printer via browser e ke ip printer
kemudian ubah
Great blog! I really love how it is easy on my eyes and the information are well written.
ReplyDelete123 HP Officejet Setup 202c
ReplyDeleteNice Blog , This is what I exactly Looking for , Keep sharing more blog .
123 HP Officejet 4652 Install
Really its very useful information that you have shared and thanks for sharing the information with us.
ReplyDelete123 HP Officejet 4652
This post will be very useful to us....i like your blog and helpful to me....nice thoughts for your great work....
ReplyDeletehp officejet 4650 installation