[Just Share]
Konfigurasi Network di Opensuse 11.4
 Konfigurasi Network untuk setting IP address mesin kita di OS.Opensuse dapat dilakukan dengan tahapan seperti dibawah ini .
Buka Terminal / console :

 setelah muncul tampilan diatas , pilih edit ( alt+E)
 Pilih Static IP lalu isi Ip address , misalkan 192.168.1.67
Subnet: 255.255.255.0 atau isi dengan /24
Hostname : server.domain.co.id
jika sudah pilih Next (alt+N)

Kemudian Parameter sperti attachment diatas misalkan (disesuaikan) :
Hostname : server
Domain Name : domain.co.id
Nameserver 1 : ip server (192.168.1.67)
Nameserver 2 : ip Gateway
Nameserver 3 : 8.8.8.8 adalah IP DNS Google
Domain Search : domain.co.id
Kemudian tekan Alt+ U (Routing)
 Default Gateway : silahkan isi IP gateway internet anda (misal 192.168.1.210)
Kemudian pilih Ok (Alt+O)
Cek IP yang sudah diseting :
silahkan ketik
ifconfig
Pastikan IP yang muncul adalah IP yang sudah disetting tadi diatas
-------------------------------------------------------------------------------------------------------------------
Konfigurasi DNS (Domain Name Server) di Sles 11
DNS adalah sebuah aplikasi untuk menukarkan nama komputer ke alamat ip dan sebaliknya. DNS diimplementasikan oleh sebuah software bernama BIND (Berkeley Internet Name Domain). BIND dalam pekerjaan sehari-hari dinamakan named
Di console ketik
 Buat DNS Zones, isi Nama domain
misal isi di field Name : domain.co.id , lalu tekan ALT+A (Add)
setelah Add , kemudian tekan ALT+I (edit)
 Pada Basic Setup , biarkan apa adanya artinya tidak ada yg diubah .menuju NS Records (ALT+D)
 Pada Bagian NS Records isi Name Server (NS)
Misal : ns1 ==> ketikan saja ns1 tanpa nama domain kemudian ALT+A (add) , nama domain akan otomatis muncul di Name Server List . dilanjut ke MX Records (ALT+X)
 di Menu MX records
Address : isi dengan mail atau mailserver terserah anda , contoh saya isi server (tanpa nama domain) kemudian tekan ALT+A (add) , nama domain akan otomatis muncul di Mail server List
Dilanjutkan ke menu Record (ALT+E)

di Menu Records , Isi Recordkey
1. ns1 , Value :192.168.1.67 kemudian Tekan ALT+A (Add)
2.server , Value : 192.168.1.67 kemudian Tekan ALT+A (Add)
Lalu Tekan ALT+O (ok)
 Pilih Service Start : When Booting ( ALT+B)
Tekan ALT+O (ok)
 Cek DNS Server apakah sudah benar settingnya dengan perintah :
nslookup hostname.domain.tld
nslookup server.domain.co.id
Pastikan IP yang muncul adalah IP Server ( 192168.1.67) lihat gambar diatas
kemudian Cek DNS dengan perintah dig
dig domain.tld MX
dig domain.co.id MX
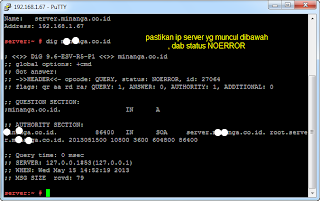 Pastikan IP yang muncul adalah IP server kita
Konfigurasi Network di Opensuse 11.4

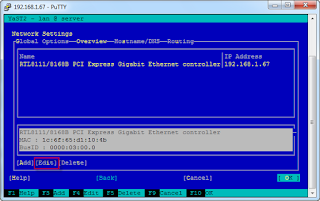
Buka Terminal / console :
yast lan


Subnet: 255.255.255.0 atau isi dengan /24
Hostname : server.domain.co.id
jika sudah pilih Next (alt+N)

Kemudian Parameter sperti attachment diatas misalkan (disesuaikan) :
Hostname : server
Domain Name : domain.co.id
Nameserver 1 : ip server (192.168.1.67)
Nameserver 2 : ip Gateway
Nameserver 3 : 8.8.8.8 adalah IP DNS Google
Domain Search : domain.co.id
Kemudian tekan Alt+ U (Routing)

Kemudian pilih Ok (Alt+O)
Cek IP yang sudah diseting :
silahkan ketik
ifconfig
Pastikan IP yang muncul adalah IP yang sudah disetting tadi diatas
-------------------------------------------------------------------------------------------------------------------
Konfigurasi DNS (Domain Name Server) di Sles 11
DNS adalah sebuah aplikasi untuk menukarkan nama komputer ke alamat ip dan sebaliknya. DNS diimplementasikan oleh sebuah software bernama BIND (Berkeley Internet Name Domain). BIND dalam pekerjaan sehari-hari dinamakan named
Di console ketik
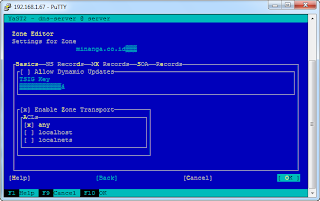
yast dns-server

misal isi di field Name : domain.co.id , lalu tekan ALT+A (Add)
setelah Add , kemudian tekan ALT+I (edit)


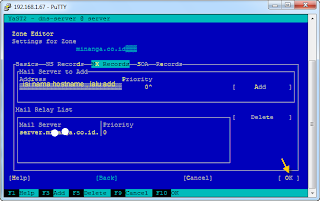
Misal : ns1 ==> ketikan saja ns1 tanpa nama domain kemudian ALT+A (add) , nama domain akan otomatis muncul di Name Server List . dilanjut ke MX Records (ALT+X)

Address : isi dengan mail atau mailserver terserah anda , contoh saya isi server (tanpa nama domain) kemudian tekan ALT+A (add) , nama domain akan otomatis muncul di Mail server List
Dilanjutkan ke menu Record (ALT+E)

di Menu Records , Isi Recordkey
1. ns1 , Value :192.168.1.67 kemudian Tekan ALT+A (Add)
2.server , Value : 192.168.1.67 kemudian Tekan ALT+A (Add)
Lalu Tekan ALT+O (ok)

Tekan ALT+O (ok)

nslookup hostname.domain.tld
nslookup server.domain.co.id
Pastikan IP yang muncul adalah IP Server ( 192168.1.67) lihat gambar diatas
kemudian Cek DNS dengan perintah dig
dig domain.tld MX
dig domain.co.id MX

Comments
Post a Comment