
Simple Static Route Mikrotik

Hai .....
Share  tutorial Static Route , 1 ISP menggunakan 2 router mikrotik untuk 2 network segment IP berbeda

Router A
Ether1 dari  terhubung dengan Gateway dari ISP , 
Ether 2 terhubung dengan Switch hub 192.168.1.0/24 yang berfungsi menghubungkan client di LAN1
Ether 3 terhubung dengan Ether 1 di router B sebagai gateway untuk klien terhubung dari LAN2
Router B
Ether 2 terhubung dengan Switch Hub 192.168.2.0/24 yang berfungsi menghubungkan client di LAN2

Konfigurasi
Asumsi  bahwa ISP memberikan alamat 139.193.111.111 dan gateway 139.193.111.1 
Router A:


/ip address add address=139.193.111.111/24 interface=ether1-Gateway
add address=192.168.1.202/24 interface=ether2-LAN
add address=172.16.1.1/30 interface=ether3-Routing

/ip route add dst-address=0.0.0.0/0 gateway=139.193.111.1 add dst-address=192.168.2.0/24 gateway=172.16.1.2


Router B :

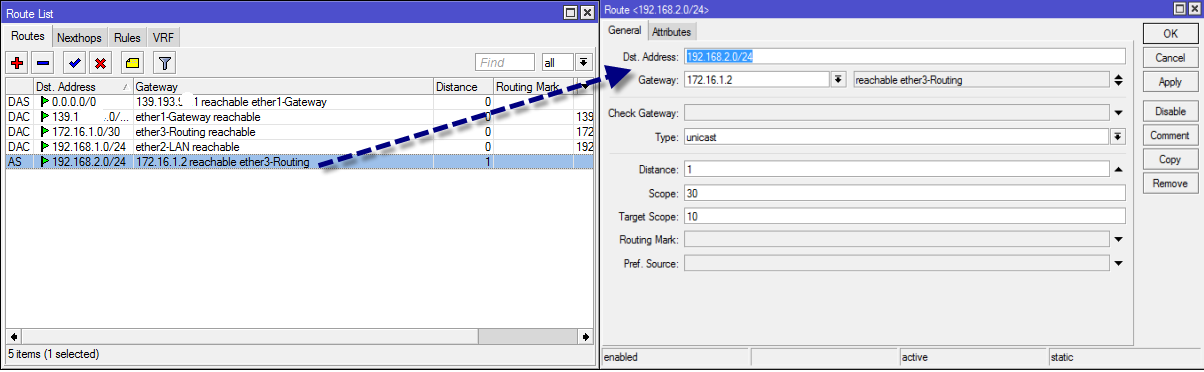
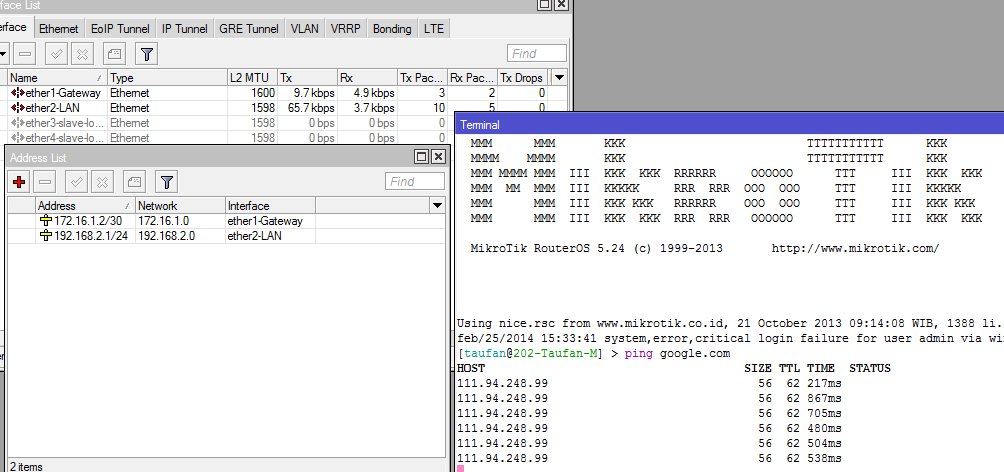
/ip address add address=172.16.1.2/30 interface=ether1-Gateway add address=192.168.2.1/24 interface=ether2-LAN 

/ip route add dst-address=0.0.0.0/0 gateway=172.16.1.1


 Test Ping dari Router B ke IP Router A : 


Ping Client LAN1


Ping google.com dari Router B


Semoga Membantu 


Taufan M

Comments

Popular posts from this blog

Membuat FTP server menggunakan Windows 7[Updated]

 Just Share biar Ga Lupa .... FTP merupakan singkatan dari File Transfer Protocol. singkat aja FTP merupakan aplikasi yang memberikan akses &  transfer data antara dua komputer ( client dan server ) klo lengkapnya silahkan cek di  Wikipedia tentang FTP Saat ini saya share membuat FTP server menggunakan OS windows 7 32 bit  1. Install Terlebih dahulu FTP service      Control Panel - Program , Klik Turn Windows Feature On or off lalu Check di FTP server, Web        Management tools 2. Menunggu Installasi      3. Buka Start . ketik di Search box IIS, lalu klik IIS 4. Tampilan FTP Server , Klik Add FTP Site 5.Input FTP site name , isikan juga path Address dimana folder tersebut akan kita akses , klik next 6. Input IP Address server FTP Masukan Port Default FTP yaitu 21 , atau silahkan ubah sesuai kebutuhan  7.Pilih Authentication , saya memilih Basic agar user yang mengakses diberikan ...
Problem LDAP service  pada Zimbra  [Solved] terjadi pada server replikasi zimbra di kantor saya pada tanggal 5 November 2016 tiba-tiba error LDAP tidak mau startup service. service zimbra start Host test.domainku.com Starting ldap...Done. Failed. Failed to start slapd. Attempting debug start to determine error. daemon: bind(7) failed errno=98 (Address already in use) slap_open_listener: failed on ldap://mail.domain.com:389 Setelah cari-cari di google berhasil yaitu dengan menjalankan ulang file zmsetup.pl -Login sebagai root - /opt/zimbra/libexec/zmsetup.pl root@mailserver:~# /opt/zimbra/libexec/zmsetup.pl Operations logged to /tmp/zmsetup.11072016-131240.log Running bdb db_recover...done. Running zmldapapplyldif...done. Reboot mailserver kemudian berjalan normal ada juga yang menggunakan tutorial seperti dibawah ini (bisa dicoba): Untuk melihat service openldap yang sudah aktif : # ps -ef | grep slap openldap 1129 1 0 15:28 ? 00:00:00 /usr/sbin/slapd -h ldap:/// ldapi:/// -g...

[Arsip] Uninstal Zimbra Mail Server

UnInstalling Zimbra on Linux Uninstall Directions for Linux/All Other Operating Systems As root: 1) Run the commands: su – zimbra zmcontrol stop exit (you should be root after you run exit) 2a) Run the command:  ps -ef | grep -i zimbra If you see running processes 2b) Kill any lingering processes:  kill -9 <pid> 3a) Run the command:  df If you see "amavisd" 3b) run command:  umount /opt/zimbra/amavisd<-new-blah>/tmp 4)  cd /<tmp_tar_install_dir>/zcs/ 5) Run the command:  ./install.sh -u 6) Run the following commands to complete the unistall: rm -rf /opt/zimbra rm -rf /var/log/*zimbra* rm -rf /tmp/*zimbra* rm -rf /tmp/hsperfdata* rm -rf /tmp/install.* rm -rf /tmp/*swatch* rm -rf /tmp/log* Ensure that you removed ALL the files owned by the user zimbra AND that contain the name "zimbra" in: /var/log/ /tmp/ 7) Run the following commands to delete the users and groups: userdel zimbra userdel postfix groupdel zimbra groupdel postfix 8) Remove th...